Showing posts with label Flash Scripting. Show all posts

Wednesday, March 26, 2014

Preloader in Flash Develop

From my previous post, once you have started to embedding swf (huge ones especially) you probably notice that while loading, you are faced with a blank screen or suffers from preload animations... depends on how your project is. So there must be something to do away with this... ... something called preloader. Thankfully, there is a project type in Flash Develop called..."AS3 Project with Preloader"


What it does is it creates a project with a preloader.as. Yup...


And if you view in the Main.as, you will spot the preloader in the
[Frame(factoryClass="Preloader")]
Just compile away and you have your very own swf with a preloader.

Now look into preloader.as

You get comment sections like
// TODO show loader 
// TODO update loader
// TODO hide loader
They are simply placeholders that you can add codes into.

Now in a preferred situation, you will want to add a background image in your preloader. First make an image. I name mine "preloading.jpg"

Put it in the same directory as the codes and add in
[Embed(source = "preloading.jpg")] public var PreloadLogo:Class;
right at the start of the class Preloader declaration. Now in order to use the jpg image you need to add
import flash.display.Bitmap;
at where the imports are. Now at the // TODO show loader, add
var activeLoadBitmap:Bitmap = new PreloadLogo();
addChild(activeLoadBitmap);
That's it. Just compile and run it. Yeah.. it works...

What do you mean you want more?
Wha?
Status? Progress?

Ok I will add a textfield to this just to show the progress status.
Now in order to use a textfield, you need to add
import flash.text.TextField;
Then at the start of the class declaration add in
public var textFiled01:TextField = new TextField;
public var loadperc:int;
Now right after the addChild(activeLoadBitmap); add...
addChild(textFiled01);
Now at the // TODO update loader add in these two lines...
loadperc  = e.bytesLoaded / e.bytesTotal * 100;
textFiled01.text = "Load " + loadperc.toString() + " %";
Compile and ran... that's it. now your preloader comes with a 'Load xxx %" shown on the top left corner! And it will automatically goes to the "main" after finish loading. Here is how mine look like...

Friday, March 21, 2014

Mochimedia closing down :( Absolute beginner blurrr case scenario for MMF users for Ad quickfix with Flash Develop

Well mochimedia will be closing it's doors coming 31st March 2014. :( With this, it will be the end of all my ads revenue from mochimedia. I have been using Multimedia Fusion for my flash games for some time so adding in the mochiads is rather simple as it's a built in feature for MMF Developer Edition.

The two immediate alternatives for ads I found is FGL and ZuperAds. FGL has been a long player in the industry while ZuperAds is a startup that is shaping up rather nicely after mochi's announcement of it's closure. None of them had an extension in Multimedia Fusion for it's flash exporter :(. I am sure sometime later it will be in but meanwhile I am left with embedding the swf files created by MMF in another SWF which acts as a container that serves the ads.

I am going to walk through on how to add FGL ads as at time of writing, ZuperAds requires you to call ZuperAds,hideAd(); to hide the ads once it's displayed while FGL handles the close ads on it's ad container itself... just to keep it simple.

This might not be the best way but it works... for now.

Ok here goes... what you need.
  • FREE Flash Develop - Get it HERE
  • . Download get the latest. I got mine yesterday ver 4.5.2 Zipped version.
  • FREE Adobe Flex SDK - Get it HERE Now if you got the Flash Develop Zipped version like me, you need to manually download this.
  • FREE Flash Player Active X Debug version - Get it HERE
Yes... I am a bit on a tight budget so everything used is FREE. Even the screenshot I captured was done in FREE GIMP.
Now the hard part... go through Flash Develop Wikidocs on how to set it up properly.

Once it's up and running, create your first Flash Project as shown below.


Make sure you choose AS3 Project and not the default 'Flash IDE Project' or you gonna have problem. I named my project 'TryFGL'

Now you will get a project which has a file class called 'Main' under the src folder. Just go there and click on the Main.as file to view the content. It should look like below


Now try to compile the project... right click on the project and choose 'Built Project'


If everything goes well, the output window at the bottom should show some things that ends with a blue Done.


Congratulations! You are a winner! Ahhh... that's not that bad. You have compiled your swf. It's located in your project directory's bin directory.


Now you need to signup with FGL to get the codes... well I am not going to walk you through the signup and getting the codes part. Just go to FGL.
...
..
.
I am just gonna assume you are able to figure it out by yourself, get the "FGLAds.as" file and get to the 'Download Ad Code' button to actually download the ad code for your game. You will get something like [NAMEOFGAME]_adcode.as. Mine is InvaderDefender_adcode.as.

Just copy the two files over to your project's src folder along with your SWF files created from MMF. Mine is InvaderDefender.swf


Open up the [NAMEOFGAME]_adcode.as. It should look like this.


Note the FGL Ad code number "FGL-2xxxxx28". Now go back to the main.as code and edit it as below.


Ok for those lazy lads that do not like typing... here is the code
package 
{
 import flash.display.MovieClip;
 import flash.events.Event;
 import FGLAds;
 [SWF(frameRate='30', width='550', height='400', backgroundColor='0xffffff')]
 /**
  * ...
  * @author 
  */
  
 public class Main extends MovieClip
 {
  
  [Embed(source = "InvaderDefender.swf")] public var MMFswf:Class;
  public var ads:FGLAds  = new FGLAds(this, "FGL-2xxxxx28");
  
  public function Main():void 
  {
   if (stage) init();
   else addEventListener(Event.ADDED_TO_STAGE, init);
  }
  
  private function init(e:Event = null):void 
  {
   removeEventListener(Event.ADDED_TO_STAGE, init);
   // entry point
   ads.addEventListener(FGLAds.EVT_API_READY, showStartupAd);
   
   var MMFswf:MovieClip = new MMFswf() as MovieClip;

         MMFswf.x = 0;
         MMFswf.y = 0;
         addChild(MMFswf);
         MMFswf.gotoAndStop(0);
   
  }
  
  private function showStartupAd(e:Event):void 
  {
   ads.showAdPopup(); 
  }
  
  
 }
 
}


Now, if only you would spent some time to read and understand the codes... but I guess you won't so... for a quick fix just change the

InvaderDefender.swf to your MMF swf filename.
FGL-2xxxxx28 to your FGL Ad Code.

Now lets compile! Yup... that's it! You have successfully embedded your MMF produced SWF into a new SWF with an ad container from FGL. Just click on your index.html in your bin folder.


Your FGL ad should display on top of your game!


Hope this article is useful.

Friday, August 20, 2010

Keyboards with Flixel.. my moving ship.

Okay.. we will be continuing from the previous tutorial of clowness clownship. Now where were we? Ahh.. lets see.... we have the ship on screen (Better read the previous tutorial if you are a bit on the blurr side.... Previous Tutorial)

On this tutorial what we are gonna achieve is :

- Import bitmap into the game Done
- Add the imported bitmap as a sprite to the game Done
- Extend the clownship class (Adds more functionality to the Clownship class)
- Taking care of keyboard presses
- Introduction to movement
- Checking for boundaries so that our ship does not go beyond the viewable area

Meanwhile flash has moved to CS6 ... nah not yet as far as I know... still stuck with CS5. Anyway we are using Flash Develop so the only concern is the Flex SDK ... really... no really... really really...

Back to the codes... your directory should look as below.


Note the 3 files...

1. ClownShip.as
2. LoadMeShip.as
3. Main.as

The Main.as sets up the entire flash player and calls LoadMeShip.as.
LoadMeShip.as then creates a new ClownShip instance called cship.

Below is the code for Main.as


package

{
import org.flixel.*;

public class ClownShip extends FlxSprite
{

[Embed(source = "data/clownship.png")] private var ImgShip:Class;

public function ClownShip()
{
loadGraphic(ImgShip);
}

}

}


Yet again the code for LoadMeShip.as


package
{
import org.flixel.FlxState;

public class LoadMeShip extends FlxState
{
private var cShip:ClownShip;

public function LoadMeShip():void
{

cShip = new ClownShip(100, 100);
add(cShip);
}
}
}


Wait a minute... it's not the same as the previous example... what's with the cShip = new ClownShip(100,100);
It was cShip = new ClownShip(); before.

Well my furry friend, let me introduce you to these things called parameters... what we are doing here is passing in 100 and 100 again as parameter numero uno no 1 and no 2 to the ClownShip. This also means that our previous ClownShip.as has to be modified to accept and use those parameters.

It's like when you get an aiskrim icecream for free you don't pass any money to the seller. The seller don't even need to count the money... but when you purchase the icecream with money, the seller has to have the ability to count the money.... whatever... what kind of sick example is this?

The entry point (constructor) to the ClownShip.as class is the function which has the similar name to the class name.
Previously on X-Files we have ...


public function ClownShip()
{
loadGraphic(ImgShip);
}


as the entry point (constructor... get used to the term constructor cause this is widely used by people that talks funny...)

To make it able to accept parameters we need to add it in the function declaration...


public function ClownShip(x:int)
{
loadGraphic(ImgShip);
}


Note the x:int. This means accepting 1 parameter named x of type integer (32-bit signed integer). Yes you need to declare what kind of parameter this bozo constructor is accepting. But wait... there are 2 of them.. 2 jedi knights? Now there are 2 of them!
So us having a higher plain of intelligence will quickly deduced that the constructor should look like this...


public function ClownShip(x:int,y:int)
{
loadGraphic(ImgShip);
}


Get it? I do hope you do. Now loadGraphic has been explained about a million times in the previous tutorial so I am not gonna go into that.

Ok now you can accept 2 parameters into the constructor, now what? The 2 parameters from cShip = new ClownShip(100, 100); is actually the X and Y coordinates where we want the ClownShip to appear, so within the ClownShip main function we call "super(x, y);". It should now look like this...


public function ClownShip(x:int,y:int)
{
super(x, y);
loadGraphic(ImgShip);
}


Wha? super? What the? Ok I think we need some words about the "super" function.
Here goes...

Long ago in a galaxy far far away.. the hope of freedom ..

Now which class was ClownShip extended (derived) from? Any answers? Yes.. the FlxSprite class... (from the "public class ClownShip extends FlxSprite") so whenever we call "superman", it simply means that we are calling the superclass's constructor...
...
..
.
which in this case is the constructor function of FlxSprite, which is

"public function FlxSprite(X:Number = 0, Y:Number = 0, SimpleGraphic:Class = null)" from the FlxSprite.as file.

No don't look into the FlxSprite.as... just look into the documentation that comes with Flixel. From there you will also find out that the first and second parameter passed into the super corresponded with the X and Y coordinate of the created instance.

Okay so now "super" simply means referring to the parents (extended from) object. You can even call the parents object's function / method ... lets say you wanna call the "update" function from FlxSprite.. you can simply call "super.update();" which you are gonna use in the near future. :D

So I hope you pretty much get the idea of "super". While "duper" simply means calling the grand...

Now we are going to add a function which Flixel calls each game loop, the ultimate most important function of them all the "update" function. Now if you look into the FlxSprite there is already an update function which has been inherited into the ClownShip.as class so why do we need to add it somemore?

You are right.. it has already been inherited but then we wanna modified that update function to add in listeners for keyboard strokes so we want to override it's parents update function. How are we gonna do this? Well we use override...


override public function update():void {
}


What this means now is whenever Flixel calls the update for the ClownShip... it totally ignores the one it inherited from the FlxSprite and goes straight into the overrided one above. Overrided? Is this even a word? Should it be overrode or overlord or something... all hail Starcraft! SO far it does nothing...

We need to fix this. We need to add something to it... we need the FlxG.keys.xxx


override public function update():void
{
if(FlxG.keys.LEFT)
{
x -= 3;
}
}


FlxG.keys contains the keyboard stuffs you are looking for. To test for the left arrow key presses the "FlxG.keys.LEFT" is used
So here we are telling if the LEFT key is pressed we need to minus the x coordinate of the ClosnShip by 3 pixel making it move to the left by 3 pixels.
x -= 3; is the same as x = x - 3; It was implemented long ago during the Mayan time
Now which is what key as what who where?
Simple... in Flash Develop, when you key in FlxG.keys. ->upon hitting the "." after "keys", a whole list of keys will appear for you to choose so you don't need to remember what key as what who where.

Now cater for RIGHT, DOWN and UP...


override public function update():void {
if(FlxG.keys.LEFT)
{
x -= 3;
}
else if(FlxG.keys.RIGHT)
{
x += 3;
}
else if(FlxG.keys.DOWN)
{
y += 3;
}
else if(FlxG.keys.UP)
{
y -= 3;
}
}


Now run the game... tadaaa... you have keyboard control of the ship :D Yeah it goes beyond the viewable boundaries so we add...


if(x > FlxG.width-width-4)
x = FlxG.width-width-4; //Checking and setting the right side boundary
if(x < 4)
x = 4;

if(y > FlxG.height-height-4)
y = FlxG.height-height-4; //Checking and setting the right side boundary
if(y < 4)
y = 4;


This should stop it from going beyond the boundaries with a 4 megapixel margin :D

The final ClownShip.as should look like this..


package
{
import org.flixel.*;

public class ClownShip extends FlxSprite
{
[Embed(source = "data/clownship.png")] private var ImgShip:Class;


public function ClownShip(x:int)
{
super(x, y);
loadGraphic(ImgShip);
}
override public function update():void {

if(FlxG.keys.LEFT)
{
x -= 3;
}
else if(FlxG.keys.RIGHT)
{
x += 3;
}
else if(FlxG.keys.DOWN)
{
y += 3;
}
else if(FlxG.keys.UP)
{
y -= 3;
}

if(x > FlxG.width-width-4)
x = FlxG.width-width-4; //Checking and setting the right side boundary
if(x < 4)
x = 4;
if(y > FlxG.height-height-4)
y = FlxG.height-height-4; //Checking and setting the right side boundary
if(y < 4)
y = 4;
}
}


You should now have some idea about "super" and the all important "update" function which is called each game loop.
Also important is the concept of parent and child function overriding :D

The end product should look like this ...


That's about it this time :D This is turning out to be an introdution and understanding of classes and stuffs rather than game programming... hmm... well next time we are going to look into Flixel specific variables like Speed, Acceleration, Drag and how to handle multi key presses which you already know :D from the code above hehehe

Sunday, June 27, 2010

Of bitmaps and sprites in Flixel

Previously on winterglass, we learn how to setup and run an empty flixel project. If it works, congrats! If it doesn't it's time to call for help... :D cause I am moving forward to the next tutorial.
What we are going to do here is to :

- Import a bitmap into the game
- Add the imported bitmap as a sprite to the game
- Eat with your nose!

Since we are not working in the Adobe Flash Pro interface we do not have the tools to draw lavishly beautiful vector sprites. We are left with the option of importing Starcraft SUV sprites from the mpg files from external file.
Importing bitmap in Flixel does not restrict you to bitmap as in bmp files but you get the variety of png, jpg and bmp to choose from each with their own unique advantages. I will be dealing with png since it's clean unlike jpegs lossy compression and has transparency :D
Yes, transparency information in png. We will need to draw a 'ClownShip' with external drawing packages like GIMP, Photoshop, CorelDraw... MS Paint.

Here is my ClownShip below!


I call it clownship.png. Cool right? I mean if you compare with the old vector ClownShip from my previous tutorials. This is a side view instead of the old top down view. You got it right, I am gonna make a left right scrolling shooter instead of the old top down. Enough about directions, since I am writing this tutorial I minus well do it nicely with a good game to end up with in the end.
You might consider buying a Wacom tablet if you are into drawings. It makes drawing sprites ....... easier.

The sprites we are importing is a 64 x 32 pixel sprite. The filename I choosed is clownship.png located at 'data' directory. Yes I created a directory called 'data' inside of 'src'


Now we are going to create a class for the clownship. Why? because creating classes for stuffs makes it easier to control / manage once the project gets big. You will need classes for the player, the enemy...
Under 'src', right click and Add->New Class. Call the new class 'ClownShip'. You will get a ClownShip.as file created for you in the 'src' directory.

Your directory should now look like this.


Now open up the file in the editor. Again you are not interested in the default items in the file. Replace them with these.


package

{

import org.flixel.*;


public class ClownShip extends FlxSprite

{

[Embed(source = "data/clownship.png")] private var ImgShip:Class;

public function ClownShip()

{

loadGraphic(ImgShip);

}

}


}


Lets go line by line again. In the previous episode, we started with classes that extends FlxGame then goes into FlxState. It simply means... We create a game base and put in a stage to the game. All game needs a stage even if it's just a title screen, a game level 1, 2, 3...
Now we need to put in a player or sprite so we extends the FlxSprite thus the public class ClownShip extends FlxSprite

[Embed(source = "data/clownship.png")] private var ImgShip:Class;
- This is the way to tell it to import a bitmap picture called clownship.png in the 'data' subdirectory and refer to it as ImgShip.

loadGraphic(ImgShip);
- Ok loadGraphic is a function inherited from the FlxSprite class. Just go ahead and open the FlxSprite.as from the 'src/org/flixel/FlxSprite.as' directory and search for loadGraphic
- Since it's in the constructor function of ClownShip, it simple loads the bitmap whenever it's created / instantiated.
- The are other parameters which can be passed into the loadGraphic function. I will go that later but if you are interested you can just view the doc that comes with flixel.

Ok now that you have created the ClownShip class, try hitting 'F5'... waaa laaaa.. nothing happens. Why? Because you didn't add it in the stage / state. Go back to LoadMeShip.as
Declare the ClownShip and add it in the state! The code should look like this.


package

{

import org.flixel.FlxState;


public class LoadMeShip extends FlxState

{

private var cShip:ClownShip;


public function LoadMeShip():void

{

cShip = new ClownShip();

add(cShip);

//trace('I am running');

}

}

}


private var cShip:ClownShip;
- You declare a ClownShip and call it cShip. You kinda need to grasp the concept here.
- You are telling it that there is a thing called cShip which is a (type) ClownShip.

cShip = new ClownShip();
- You are instantiating / creating the cShip as a new ClownShip. Basically you can create / instantiate lots of ClownShips with a different name but make sure you declare them first. This one so happends to be named cShip. Am I making sense? I am sounding weird here...

add(cShip);
- Now you are adding the cShip, which is a type ClownShip to the playing stage! By default it's located top left ( x = 0, y = 0 )
- What, where did 'add' come from? Take a guess.... yes it's from the FlxState class. To see what it does, just go to the doc under FlxState class and read on.. it tells you it needs an FlxObject to be passed in. FlxObject? Well now take a look at FlxSprite doc file. You see it says it inherits from FlxObject so making it a FlxObject... confuse?... you need to look into these docs often to get up and running on these libraries.

//trace('I am running');
- The // means I commented out this line of code. I think you all knew this already... I just needed this article to be a bit longer.

Now hit 'F5' again. ta daaa.... you have the ship up at the top and it's ready to move around. Now hit the arrow keys. Yes.... yes..... it's not moving.
You will have to wait for the next episode for that to happen! So stay tuned...

Thursday, April 15, 2010

Absolute Ultra Beginners guide to Flixel with Flash Develop

In the previous episode, we see the introduction of game libraries in flash scripting language namely Actionscript 3 or AS3. Ok I am going to make some huge assumptions here. What I am assuming are...

- You are rather well to do with AS3
- You have already looked through my previous tutorials
- You know how to setup and already installed Flash Develop
- You have already link to the Flex SDK (FREE download btw) and compiled the 'Hello World' example I previously wrote about.
- You do not wear skirts
- You are geeky

Ok.. here I am also assuming that

- You want to program a game
- You want to program a 2D game
- You want to program a 2D game with sprites
- You want to program a 2D game with sprites in AS3
- You want to go head on with Blizzard WOW

If you are looking for 3D Flash, look elsewhere or maybe look here in like a few years later. I know we already have Papervision and other stuffs but I am still trying to grab 2D.

First I will need you to download a game library... it will be Flixel.. yeah... Wha? Why not Flashpunk? Do not argue with the master programmer
Well err... currently I have already started with Flixel. Yes I lied... I started with Flashpunk but it kinda links me to Flixel
Ok the reason being that flixel have less letters to type. There!

Start an 'AS3 Project' under Flash Develop. Flash Develop will generate those default files. I call my project name Ship. What we are going to do is to :

- Add a AS3 Project
- Setup the Flixel Library
- Initialises the FlxGame and FlxState
- View the prebuilt in features

After creating a new project, you will get a Main.as default file and if you press 'F5' to test the movie, it will be a blank screen.

Now it will look like this in the Main.as.


Clear all those texts and import stuffs because we are going to use flixel and when we use flixel, flixel handles the import for us in the library itself whatever that means.


package
{
import org.flixel.*;
[SWF(width = "500", height = "350", backgroundColor = "#000000")]

public class Main extends FlxGame
{
public function Main():void
{
super(500, 350, LoadMeShip, 1);
}

}

}


Just copy whatever is in above and replace whatever which was in the Main.as with it. There... hit 'F5'. You got a game running! Yeah!
...
..
.

Sadly no... it's not that easy.

You did download the flixel library already right? Just unzip it and link to the library via the properties in the..... wait... there is a less confusing way... just copy the 'org' folder in the 'src' folder in the project.
It should look like this in the Project view.


Ok now that you have copied the items into the correct place, hit 'F5' Wha? Again? You should get an error stating some undefined properties LoadMeShip. It's ok.


Let's go line by line on the code we just put in.

import org.flixel.*;
- This simply means we are importing the flixel library located at org/flixel folder relative to the main.as and * simply means everything. So it translate to 'gimme everything from org/flixel'

[SWF(width = "500", height = "350", backgroundColor = "#000000")]
- Since we don't have a nice interface to tell how big we want the flash movie to be like in Flash Pro, we have to do it here like this. The parameters should explain themselves. Or should they?

public class Main extends FlxGame
- Why? extends? What? The class name 'Main' directly relates the the filename Main.as. When compile, the system will look for the filename as the class name so basically this is the entry point.
- extends? If you have some kind of programming background this is equivalent to inherit. I hope I am right but basically this means the Main class inherits the FlxGame class (which by the way is located in org/flixel/FlxGame.as) and is capable of extending it's functionality. Gosh correct me if I am wrong...
- If you look into FlxGame.as you will see it imports flash.display.Bitmap, Sprites and all so basically this FlxGame imports those stuffs and when you import extends FlxGame.as you kinda use those too.
- Ok why do we need to extend from FlxGame? Well this is the kinda core class to extends from when using Flixel. To actually learn more about this, you can view in the documentation that comes with the downloaded library under docs/index.html. You will need to refer to these docs VERY frequently as I have to really understand the library you are using. It helps. It really does... and if you are wondering... wow.. these documents are cool.. how do they do that and keep up with all the updates. The answer is 'You can do it too :D' In Flash Develop, look under Tools->Flash Tools->Documentation Generator... wait I am going off topic... later then.

public function Main():void
- Hmm.. how do I explain this. This is actually the constructor function of the class. A function with the same name as the class will be it's constructor, the one that executes upon initialisation of the class , much like Protoss Executor from Starcraft I... I am talking rubbish again
- This is what will run first. As a further reading for you guys, read up on destructor.

super(500, 350, LoadMeShip, 1);
- No relation to Superman, try to guess what it does?
- Although not immediately clear, the 'super' actually calls the class's superclass's constructor!
- Yes... Main being an extention of FlxGame, so Main's superclass is actually FlxGame class and FlxGame constructor is actually the FlxGame function in the FlxGame class which is in FlxGame.as file in org/flixel folder :p. Get it? I really hop you do because, there will be lots of super calling in the future and I really hope you know what it actually means.
- Note the parameter passed in and relate it to the FlxGame constructor function : FlxGame(GameSizeX:uint,GameSizeY:uint,InitialState:Class,Zoom:uint=2)
- 500 = GameSizeX:uint (Width of hte game screen)
- 350 = GameSizeY:uint (Height of the game screen)
- LoadMeShip = InitialState:Class (It will look for the LoadMeShip class, in this case, it's not found cause we have not add it yet!)
- 1 = Zoom:uint=2 (Zoom level with a default of 2)

So now that you realised the error came from the missing LoadMeShip class, all you need to do is to add that class in. Right click on the 'src' folder and Add->New Class


Call it 'LoadMeShip'. Again we don't want the default items in the class so just clear them out and replace with ...


package
{
import org.flixel.FlxState;

public class LoadMeShip extends FlxState
{

public function LoadMeShip():void
{
trace('I am running');
}
}
}


FlxState? What's that? Lets just put it as errr.... game states. You know like menu screen, level 1, level 2... so basically it's a game state we are dealing with here.
You can read more about it in the docs. Now hit() 'F5' to run the test movie. If you get the

'Warning: This compilation unit did not have a xxx specified in Frame metadata to load the configured runtime shared libraries. To compile without runtime shared libraries either set the -static-link-runtime-shared-libraries option to true or remove the -runtime-shared-libraries option.'


You should already know how to solve this (for Flex SDK 4) in my previous post. Just add

-static-link-runtime-shared-libraries=true


in the Project->Properties->Compiler Options->Additional Compiler Options
Everything should run fine now. If you are fast enough you can catch the volume control sliding up out of view. This is a default for the volume control. You have lots of other prebuilt stuffs too. Try pressing '`'. You get a console telling your framerate and other infos. If you lose focus on the flash window, your game pauses and a pause screen shows :D
So basically these are the stuffs which are handled by the Flixel game library.


You should also be able to see the 'I am running' in the output panel in Flash Develop! If not you might be using a non debug flash player (solution also explain in my previous blog entry).

Ok that's about as much I am able to write here for today. Sleeping already? Yes it's kinda boring at first but all these needs to be done for the progress to the next tutorial.

Friday, November 21, 2008

Have you heard of '3D Flash Animator'?

Have anyone heard of '3D Flash Animator'? It's suprising this piece of sweet software is not mentioned often. Although I would say it's not exactly what the software name suggest... it's also actually a 'click and produce your game' software much like the old 'Klik & Play' with actions and all those... even scripting if you are really into it!

You can use it's various actions available for the objects (if you find programming AS3 to be really mind bogging unlike some 'multimedia fusion' tool... ).. not too many though... but you have the basics for a good game like collisions and such...

The end result may be output in the web just like normal flash would...

Anyway if you are interested, you can visit the site at http://www.3dfa.com

Tuesday, November 11, 2008

AS3 09 - Collision Detection

You have put something on screen, move it around with your keyboard and shooting stuffs out of it. Logically, we should now put in something to shoot at before we get bored. But before we go into that lets listen to me talk some nonsense, lets talk about collision detection a little. Hands up for those who knows what ‘collision detection’ means… ahh.. I see all of you know this… so therefore I shall will shall will not linger around any longer… anyway it’s basically how you measure if something collides with another… like err… bullet overlaps or intersects with enemy shit ship. Say.. that sounds familiar… that sounds like the hitTestObject() method definition in AS3. Yeah.. I took the ‘overlaps or intersects’ right out of that one. So all you need to do is to run object A hitTestObject with object B and this little joker method returns ‘true’ or ‘false’.

Now down to codes and stuffs that might bore you. First create the enemy, for simple sake my enemy look like a red trangle with a black outline. I convert it into a movie symbol and called it ‘myEnemy’. Create a new AS3 Class file for myEnemy and all those class shit stuffs.

The class file looks like this..

Filename : myEnemy.as


package {
import flash.display.*;

public class myEnemy extends Sprite{

private var timeVal:int;

public function myEnemy(x,y){
this.x = x;
this.y = y;

}

}

}


Just a simple class to place the enemy on the x and y location specified when initializing.
Now we need to add it in the main AS309.as file. (Yeah you need to create and change all the name to follow the tutorial from AS308.as… also remember the class and the constructor’s name needs to be change accordingly... I am not gonna tell you how because I told you in the previous tutorial… muahahaha....)

At the declaration section, add in …


var oneEnemy:myEnemy;


…and in the main function AS309 after the addChild(ClownShip);, add in…


oneEnemy = new myEnemy(stage.stageWidth/2,40);
addChild(oneEnemy);


Now you got a completely easy target placed directly in front of the ship. Start shooting at it. Now lets add in collision detection. We are going to add a text object on screen to tell you how much hit you got.

For this, let me introduce to you the “import flash.text.TextField;”. You will need to import this whenever you deal with textbox and such. To cut some explanation short, add these codes in the main AS309.as file…

In the declaration section…

var myHitsTxt:TextField;
var myHitsNo:int;


In the main AS309 function…

myHitsTxt = new TextField();
myHitsTxt.x = 10;
myHitsTxt.y = 10;
addChild(myHitsTxt);
myHitsTxt.text = String(myHitsNo);


… put that piece of code just before the closing bracket. Why? Because we want it to Trender last, after the clownShip and enemy. Now for the actual event that calls the hitTestObject… we add in an event which runs every frame that calls the checkCols function which test the objects for collision…


stage.addEventListener(Event.ENTER_FRAME, checkCols);


And the function…


public function checkCols(event:Event) {
var bulletNo:int = mybullets.length-1;
for(bulletNo;bulletNo>=0;bulletNo--){
if (mybullets[bulletNo].hitTestObject(oneEnemy)) {
mybullets[bulletNo].deleteBullet();
myHitsNo ++;
myHitsTxt.text = String(myHitsNo);
break;
}
}
}


What happens here is the code loops through every bullet (which was placed in the array) and check each one for collision with the ‘oneEnemy’. If it did collide, then we add to the hits counter, myHitsTxt. Simple right?

Now try running a test movie. Yes! Your first collision detection! Hhaha… the bullet even destroy itself upon impact. Wait.. you are not drooling yet… it’s actually a simple concept right? And if the bullet destroy itself wouldn’t that mess up the array? Well if you look at the previous tutorial, in the .deleteBullet() function, it actually splice out the destroyed bullet so when it loops through again, the array length will be less… and how come you count down – instead of count up ++ in the loop? Experience is the bext teacher so try doing it the other way around… hmm…

If you count up ++, let’s say you move from B1 to B2 to B3 to B4. Let’s say you hit on B2, that also means you splice the array and now it’s B1,B3,B4 but then you are moving forward from the front to the back… to the third position which is occupied by B4 instead of check with B3. You will be skipping one bullet… BUT if you do a countdown you splice out at the end and move forward to the front. You won’t miss a thing… get it? It’s ok… I get confuse of what I am trying to say sometimes…

Here is the final product! Download SOURCECODE


I guess that should be it this time. Next I will add in more Red Alert 3 related a simple AI to the enemy…. movement and make it shoots back.

Thursday, November 6, 2008

AS3 08 - Shooting Bullets

Continuing from the previous tutorials… Now that we got the clownShip moving about, we are going to make it shoot bullets. (Remember if you rename the main AS07.fla to AS08.fla and AS07.as to AS08.as, you need to re-link the class to the main document under the document properties to AS08.as… also… since the AS07.as is now AS08.as, you need to alter the public class name from ‘public class AS307 extends MovieClip’ to ‘public class AS308 extends MovieClip’.. and also… the constructor from ‘public function AS307()’ to ‘public function AS308()’. Please keep all these in mind)

Let’s create the bullet now. This is how my bullet look like… with 800 times magnification.


Yup… a simple circle. Convert it into a symbol and named it ‘myBullet’. Create a class for the bullet… myBullet.as. I hope these all makes sense or suffer the consequences for not reading my last tutorial… because I have already explain how to do all these in the previous tutorial. Now what we need to do is whenever the bullet is created :

It will start from the clownShip
It will move upward from the clownShip
Delete the bullet when going out of screen

So if you already have guessed it correctly, it needs the coordinates of the clownShip and then speed / direction it will move. Moving it upwards should be a loop event so we use the ENTER_FRAME event listener to trigger a function to move it upwards after the bullet has been created. When the bullet reaches beyond the top of the screen, we need to delete it. (The coordinate of a flash document starts from the top left corner and increases as it moves horizontal, x and vertical, y. So basically the top would be when y=0, the bottom would be when y = height of the document.). Then whenever we delete the bullet, we need to end it’s listener too. Don’t forget or you will let it loop to eternity and beyond!

A question arises on how do we manage so many bullets at one time? I mean how do we keep track of each bullet whenever it has been created / shoot? And the answer isssss….. array. Now what’s an array? Googling it would be a good idea as I can’t really explain that well due to my lack of wisdom. Create and array as a placeholder and push in a reference to each bullets to build up the array. Why do we need this? Well… it’s actually part of the next tutorial to loop through the bullet array to check for collision with the enemy object... I thought I would explain it here for easier understanding later on… but… well.. just remember that we put in an array to hold the reference to each bullet for the time being. Anyway the array should be in the main AS08.as class since it will be shared with other objects later on. The myBullet.as file should look like this.

Filename : myBullet.as

package {
import flash.display.*;
import flash.events.*;
import flash.utils.getTimer;

public class myBullet extends Sprite{

private var timeVal:int;
private var myspeed:Number;

public function myBullet(x,y,speed){
this.x = x;
this.y = y;
timeVal = getTimer();
myspeed = speed;
addEventListener(Event.ENTER_FRAME,moveBullet);

}

public function moveBullet(event:Event) {
var timeDiff:int = getTimer()-timeVal;
timeVal += timeDiff;

this.y += myspeed*timeDiff/1000;

if (this.y < 0) {
deleteBullet();
}
}

public function deleteBullet() {
MovieClip(parent).removeBullet(this);
parent.removeChild(this);
removeEventListener(Event.ENTER_FRAME,moveBullet);
}

}

}


I guess it’s pretty much self explanatory as most of the codes are seen on the previous tutorial except this little bugger one… parent.removeChild(this); It’s actually calling a function on the main parent class which is the AS08.as called removeChild… the part


if (this.y < 0) {
deleteBullet();
}


tells the flash player to call the deleteBullet function which takes it out of the array “MovieClip(parent).removeBullet(this)” and remove the bullet from screen “parent.removeChild(this)” and actually remove the listeners which are are not going to use anymore for that bullet “removeEventListener(Event.ENTER_FRAME,moveBullet)” since it’s deleted.

Anyway, the AS08.as look like this…

Filename : AS08.as

package {
import flash.display.*;
import flash.events.*;

public class AS308 extends MovieClip{

var leftdown,rightdown:Boolean = false;
var clownShip:myShip;
var mybullets:Array;

public function AS308(){

stage.addEventListener(KeyboardEvent.KEY_DOWN, listenKeyDown);
stage.addEventListener(KeyboardEvent.KEY_UP, listenKeyUp);

clownShip = new myShip(stage.stageWidth/2,stage.stageHeight - 40);
addChild(clownShip);
mybullets = new Array();
}

public function listenKeyDown(event:KeyboardEvent)
{
if (event.keyCode == 37) { //Left arrow
leftdown = true;
}
if (event.keyCode == 39) { //Right arrow
rightdown = true;
}
if (event.keyCode == 32) { //Spacebar
shootBullet();
}
}


public function listenKeyUp(event:KeyboardEvent)
{
if (event.keyCode == 37) { //Left arrow
leftdown = false;
}
if (event.keyCode == 39) { //Right arrow
rightdown = false;
}
}

public function shootBullet() {
var b:myBullet = new myBullet(clownShip.x,clownShip.y-20,-250);
addChild(b);
mybullets.push(b);
}

public function removeBullet(mybullet:myBullet) {
for(var i in mybullets) {
if (mybullets[i] == mybullet) {
mybullets.splice(i,1);
break;
}
}
}

}
}


I have declared


var clownShip:myShip;
var mybullets:Array;


at the base class because I am using them for the coordinates of the bullet and adding bullets into the array. Note the new


if (event.keyCode == 32) { //Spacebar
shootBullet();
}


.. is for the spacebar key… and also the new functions… shootBullet and removeBullet. shootBullet pass in the x and y-20 (why y-20? Because we want it to shoot from the tip of the front, not the middle of the ship…) coordinates of the clownShip along with the speed and direction of the bullet. Negative being moving up. 250 being moving 250 pixels per second. The removeBullet actuualy removes the bullet from the array via the splice function and breaks the loop once the item is found and removed seeing no point to go further after Neo is actually killed in the Matrix right?.

Test run the movie and see what happens. Hitting the spacebar should release the bullets from the ship. Looks nice?


Download SOURCECODE

Well, still think game programming is easy nice to dive in? Read on… err… next we will look into adding an enemy and check for collision detection with the bullets… that’s when you see why I put the array for… hohohoh… until then, kudos to The Empire of the Rising Sun for such wonderfully feeble looking tsunami tank…

Tuesday, November 4, 2008

AS3 07 – Classes, your best friend

I graduated from UPM, a local University in Malaysia and one thing that really frightens me is I actually graduated without much knowledge about classes in programming. We didn’t really have extensive classes about classes (or maybe I didn’t pay much attention) and the few classes I remembered didn’t really put much effort in classes. Hah! Maybe it’s a class of it’s own. Ok enough rubbish. They did teach about classes, just that I didn’t really think it was THAT important.

I tried to picked up Flash AS3 since last month after I bought a dummies book after the 3D demo on balls flying around got me interested and like most others.. downloaded some codes and view at them in awe and decided never to look at programming ever again. Well, we can’t cheat to learn. To learn something is to understand how it is and to understand how it is, is to spend some time with it. If you are not following this with hands-on practical, most likely you will be missing out something…

We are now at tutorial 7. We started with placing movieclips, symbols and instances in Flash, getting the input from keyboard, moving objects around based on frame and time. All these were done within the frame in the timeline. We didn’t even bother renaming ‘Layer 1’ hahahaha…


Not that it is a bad thing to start with but as you progress along the lines of insanity, you might want to confuse the readers into giving up their leisure time to do this…, you will notice the codes starts to get a little cluttered and if this continue, it will get ugly pretty unmanageable. For someone who actually read this far, I guess you must have realized that I am buying time to figure out what to write the next step is to invite in your best friend, Rudy from Hitz… ‘classes’. What are classes in terms of programming? You can get the answer by googling it. What I introduce here is how it can benefit you in Flash AS3. Let’s just redo the entire thing from the beginning but this time with classes involved.

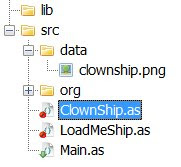
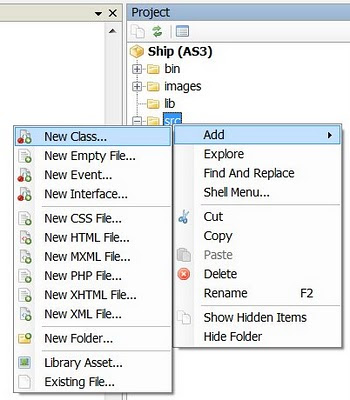
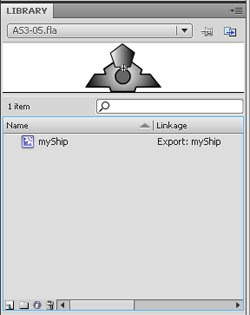
Create a new Flash File (ActionScript 3.0). Copy over the myShip symbol (the movieclip type you see in your library section. extensively referred to as clownShip in previous tutorials) Leave the timeline alone as we are not going to touch that. Now create a new ActionScript file (as shown below).


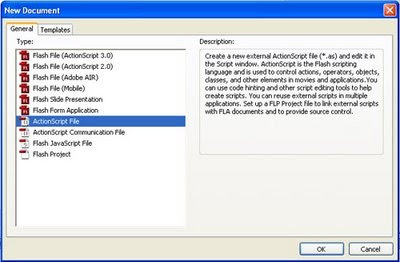
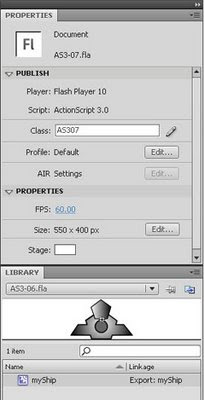
Name it AS307.as. It a big white empty space for you to write scripts in. Now go back in the main Flash File, in the document properties section create a link to the ‘AS307.as’ by typing in the Class as ‘AS307’ which is the filename of the ActionScript file we just created. It should look like this…Class : AS307 with the myShip in the Library.


Run the test movie. It’s a blank file so nothing is there. Go back to the ActionScript AS307.as file. It’s blank. Yeah.. I repeated twice.. Let’s write out our first class.


package {
import flash.display.*;
public class AS307 extends MovieClip{
}
}


If you run the test movie, it’s still a blank screen. What we did here was a bare minimum for a class declaration. Each class starts with package{} for the class. Within the package we need to import predefined items which we are going to use…. Example if we are to use the textbox functions within the class, we need to write in


import flash.text.*;


For the time being, importing the flash.display.* should be sufficient. Within the package we declare the class name. The class name we declare here must be similar to the filename of the .as file. We named our file AS307.as so the class name is AS307 not very interesting isn’t it? Now we need a constructor… what’s a constructor? It’s a function that runs whenever the class initializes, that means whenever it starts. The constructor must have the same name as the class while the destructor has a ~ in front… wait… wrong language… so the code should look like this.

Filename : AS307.as

package {
import flash.display.*; //Importing all display related…

public class AS307 extends MovieClip{

public function AS307(){ //Constructor
trace('Hello world again');
}

}
}


I put in a trace statement so when you run the test movie, you should see ‘Hello world again’ in the output window. Let’s extend this and put in the clownShip at the same time takes out the trace statement.

Filename : AS307.as

package {
import flash.display.*;

public class AS307 extends MovieClip{

public function AS307(){
var clownShip:myShip = new myShip;
addChild(clownShip);
}

}
}


Run the test. Your clownShip should appear at coordinates (0,0) like below.


Well what happened was we created a variable (var) named clownShip of type myShip with …


var clownShip:myShip = new myShip


…then we add it into the scene / stage with the addChild().

Now we are NOT going to tell the clownship to move to the near bottom middle like what we used to at AS307.as. Why? Because it’s not the OOP (Object Oriented Programming) way. Wow am I actually saying this? We are going to create another class for the myShip and then define whatever we need about the ship there. This should include an input of the start coordinates.

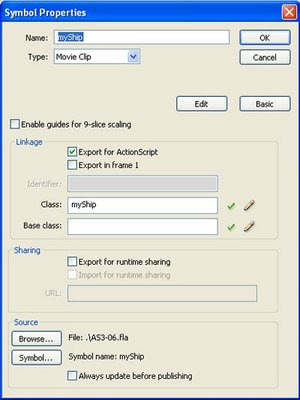
Create another ActionScript file and named it myShip.as (save it as myShip.as). This will automatically be referenced to by the myShip object in the library. How? Go back to the main flash document AS3-07.fla. Notice the myShip we copied from the previous projects in the library section? Right click it and choose to view its properties. Under ‘Linkage’ look at ‘Class’, it shows ‘myShip’. This is also the class filename for that particular symbol.


Now in the myShip.as file, code in the class and all those silly stuffs. It should look like this


package{
import flash.display.*;
public class myShip extends MovieClip{
}
}


Again we need to import the flash.display.* because we are extending the functionality of myShip from the MovieClip class which is actually part of the flash.display.* class. Am I saying it right? Please correct me if I am wrong as I am constantly thinking of Red Alert 3 Why MovieClip? There are actually 2 obvious options for this. First we created the myShip as a movieClip symbol so basically we are extending from there. Second one might ask why not extending it from ‘Sprite’? Why? I don’t want to that’s why… stop asking… Actually it’s because I intend to add animation frames in the timeline to the myShip in the future. ‘Sprite’ is simply movieclip minus the timeline. So for the time being, let’s just use movieclip. We add a constructor function which receives an x and y coordinates and a few lines to make the ship appear at the bottom middle. ‘this’ in this context refers to the myShip.


package{
import flash.display.*;
public class myShip extends MovieClip{
public function myShip(x,y){
this.x = x;
this.y = y;
}
}


Note I have 2 parameters that needed to be passed into the constructor function. This means whenever I create / initializes the myShip, I need to pass in 2 items, the x and y coordinates. So lets go back to AS307.as and alter the script a little. Put in


var clownShip:myShip = new myShip(stage.stageWidth/2,stage.stageHeight - 40);


replacing the


var clownShip:myShip = new myShip;


The codes should look like this...

Filename : AS307.as

package {
import flash.display.*;

public class AS307 extends MovieClip{

public function AS307(){
var clownShip:myShip = new myShip(stage.stageWidth/2,stage.stageHeight - 40);
addChild(clownShip);
}
}
}


We are actually passing the start x and y coordinates for the myShip. Now run the test movie. The clownShip should appear at middle bottom. My my… this is turning out to be a long winded tutorial.

Next we will need to create an event listener for keyboard and how it communicates with the clownShip. The event listener should be placed at the AS307.as file while the actually code to move the ship should be placed in the myShip.as file. Why? It’s the OOP way so stop asking… We should err… encompass… err… cover all myShip related functions within the myShip class itself. Whatever that sound like… yeah that’s it. So in the AS307.as, let us put in…


var leftdown,rightdown:Boolean = false;


…in the main public class. Wait.. I think I skipped a part. What is with the public.. public stuffs? Simple… there are only 2 popular ones… public and private. It’s like err… taxi and a normal car. In the taxi (Public transport) you can hop in and start asking and directing the taxi anywhere while in the private car, you can’t do that unless you are somehow related to the driver. Same goes here in AS3, public functions / methods / variables… are accessible by all… meaning declaring the leftdown and rightdown as public will enable other classes to access to it. If this sounds confusing, it’s time for your another best friend… google.  hehe… for more information. Anyway lets get back…

You need to put the event listerners to run whenever the class initializes / started so it should be in the constructor Constructicons merged to form Devastator.. muahahaha and kill those puny Autobots… like this…


stage.addEventListener(KeyboardEvent.KEY_DOWN, listenKeyDown);
stage.addEventListener(KeyboardEvent.KEY_UP, listenKeyUp);


Also note that those pesky listeners calls ‘listenKeyDown’ and ‘listenKeyUp’ functions. Lets code those functions…


public function listenKeyDown(event:KeyboardEvent)
{
if (event.keyCode == 37) { //Left arrow
leftdown = true;
}
if (event.keyCode == 39) { //Right arrow
rightdown = true;
}
}


public function listenKeyUp(event:KeyboardEvent)
{
if (event.keyCode == 37) { //Left arrow
leftdown = false;
}
if (event.keyCode == 39) { //Right arrow
rightdown = false;
}
}


It you notice carefully, these are the same codes we coded from the previous tutorials, we are only rearranging them in classes. Try to run the test movie. You will get an error! Why? Because unlike the codes we put in the timeline, we need to import the flash.events.*, so that the event listerner, keyboard events and other events related stuffs can work.

The AS307.as file should look like this…

Filename : AS307.as

package {
import flash.display.*;
import flash.events.*;

public class AS307 extends MovieClip{

var leftdown,rightdown:Boolean = false;

public function AS307(){

stage.addEventListener(KeyboardEvent.KEY_DOWN, listenKeyDown);
stage.addEventListener(KeyboardEvent.KEY_UP, listenKeyUp);

var clownShip:myShip = new myShip(stage.stageWidth/2,stage.stageHeight - 40);
addChild(clownShip);
}


public function listenKeyDown(event:KeyboardEvent)
{
if (event.keyCode == 37) { //Left arrow
leftdown = true;
}
if (event.keyCode == 39) { //Right arrow
rightdown = true;
}
}


public function listenKeyUp(event:KeyboardEvent)
{
if (event.keyCode == 37) { //Left arrow
leftdown = false;
}
if (event.keyCode == 39) { //Right arrow
rightdown = false;
}
}


}
}


Now that we are done for AS307.as, we move on to myShip.as. As we are going to add event listerners and use timer objects for the movement, we need to import…


import flash.events.*;
import flash.utils.getTimer;


.. add an event listerner (oh man this tutorial is getting lengthy…) and the function called by the event listener.

The whole file should look like this…

Filename : myShip.as

package{
import flash.display.*;
import flash.events.*;
import flash.utils.getTimer;

public class myShip extends MovieClip{
private var timeVal:int;

public function myShip(x,y){
this.x = x;
this.y = y;

addEventListener(Event.ENTER_FRAME,moveClownShip);
}
public function moveClownShip(event:Event) {
var speed:Number = 110.0;
var timeDiff:int = getTimer()-timeVal;
timeVal += timeDiff;

if (MovieClip(parent).leftdown == true){
this.x -= speed*timeDiff/1000;
}

if (MovieClip(parent).rightdown == true){
this.x += speed*timeDiff/1000;
}
}
}
}


Run the finish product. You should get exactly what you got when you program it in the timeline in the previous tutorial. The only difference here is the codes are now in classes instead of timeline. It requires a bit more work but the result is exactly the same what good is this anyway I just wasted my time…?err … I guess that pretty much intro you to classes. Try to take a look see and reread this again and again a few times until you get the picture /connection to the karma which holds the tsunami tank together… damn Red Alert 3. In the next tutorial we are going to make the clownShip spit I mean shot bullets upward. These are going to be in classes of course.

Monday, November 3, 2008

AS3 06 - Time based animation, My clownShip

Previously on X-Men, we see Professor X-Xavier being beaten to pulp… we managed to get a character on screen (clownShip) and control it with the keyboard (left and right arrow). We learned how to listen for events and call functions whenever the events occur. However we noticed that it’s not ‘behaving’ like a normal ship in any arcade game. It’s sluggish and there is a strange interval between the first and second keys before it starts to move continuously. Now lets make it smoother. Instead of moving the ship with each time the key press is detected, why not we create a switch which alternates between ‘move’ and ‘stop’… sounds confusing? Why not we have a switch which sets to ‘move’ when we first hit the arrow key (KEP_DOWN) and ‘stop’ when the key is release (KEY_UP). Let’s call the switch leftdown and rightdown and declare it as …

var leftdown:Boolean = false;
var rightdown:Boolean = false;

What’s a Boolean? It can only hold ‘true’ or ‘false’ which is suitable for what we want now. If we hold the left arrow down, then we set the leftdown to ‘true’, if we release the key (let go), we set the leftdown to ‘false’. In order to do that we need to change the event listeners for the keyboard.


stage.addEventListener(KeyboardEvent.KEY_DOWN, listenKeyDown);
stage.addEventListener(KeyboardEvent.KEY_UP, listenKeyUp);

function listenKeyDown(event:KeyboardEvent)
{
if (event.keyCode == 37) { //Left arrow
leftdown = true;
}
if (event.keyCode == 39) { //Right arrow
rightdown = true;
}
}


function listenKeyUp(event:KeyboardEvent)
{
if (event.keyCode == 37) { //Left arrow
leftdown = false;
}
if (event.keyCode == 39) { //Right arrow
rightdown = false;
}
}

That should get rid of the loop interval at the start.

Now that we have the alternating switch for the movement, we need to actually move the clownShip based on the Boolean value. Here we add another event listener to run at each frame with the Event.ENTER_FRAME and call the moveClownShip function.

addEventListener(Event.ENTER_FRAME, moveClownShip);
function moveClownShip(event:Event) {
if (leftdown == true){
clownShip.x = clownShip.x - 10
}
if (rightdown == true){
clownShip.x = clownShip.x + 10
}
}

Try to test the move now. It’s smoother now isn’t it? There is something still not right here. What we did so far is program based on frame rate. What this means is the clownShip’s movement is directly linked to the number of frames this Flash document is currently running in per second. Basically it’s 24 FPS (frames per second). Where did I get this? It’s a default framerate set by Flash if you start a new document which can be seen at the document properties section.


Basically the Event.ENTER_FRAME runs every frame so the higher the framerate the more times this is triggered. Try increasing the FPS and run the test movie. Move the clownShip around. It moves faster!!!... not smoother. . What we are going to do next is to alter the programming structure to base on time instead of frame. This is very important as this enables control of the animation based on the time passed no matter how slow it takes for the PC to render the image. Duh? Ok… try this… when you play single player Diablo (that’s so olddd…) on an old PC with below minimum requirement, the games slows down but you still get all the animation frames being viewable and all… (much like when you set the Flash FPS to 1) but when you play multiplayer Diablo it skips the frames and keep up with time yeah… that’s it… whatever…. Ok.. I think DoTA would be a better example. Once a while you will experience frame skipping within the game. This needs to happen because the game is trying to keep up (sync) with the rest of the clients (players) based on time. If it’s based on frame, the moment one PC slows down, the synchronization is gone. Am I making any sense???... aii… forget it

First we need a placeholder (variable) to hold time values. Let’s call it timeVal and define it…

var timeVal:int;

Now we need to alter the moveClownShip function as below…

function moveClownShip(event:Event) {

var speed:Number = 110.0;
var timeDiff:int = getTimer()-timeVal;
timeVal += timeDiff;

if (leftdown == true){
clownShip.x -= speed*timeDiff/1000;
}

if (rightdown == true){
clownShip.x += speed*timeDiff/1000;
}
}

Confused already? Instead of fixing the movement to 10 pixels per frame (previously), now we get the time difference between each frame

var timeDiff:int = getTimer()-timeVal;

and move the clownShip to their appropriate horizontal location based on the time passed from previous frame.

clownShip.x -= speed*timeDiff/1000;

Why divide it by 1000? Well, getTimer() returns the current time value in milliseconds so I am merely converting it back to seconds. Just like 1 meter = 100 centimeter = 1000 milimeters, hmm.. that should give us 1 second = 1000 miliseconds. With the speed value of 110, that means I am trying to make the clownShip move 110 pixel per second. Now try running the test movie at FPS of 1,30,60,120 moving the clownShip across the screen. Note that they all took approx 5 seconds to complete. This would be completely different if the movement was based on frame instead of time. Also note that at around 60 frames per seconds it smooth as silk  Higher framerates are have not so noticeable increase in smoothness unless you have superior/bionic eye/brain. For your info.. your cinema operates at 24fps, television 30 fps and you monitor / LCD probably gets 90 Hertz as the refresh rate. So your fps is actually capped by the display device you are using . Also films in cinema achieve such smoothness because of motion blur.. a topic which I will only go into when I talk about Lightwave 3D some err… . Anyway if all things go right, the final stuff should look something like this.


The whole code is as below :

var clownShip:myShip = new myShip;
clownShip.x = stage.stageWidth/2;
clownShip.y = stage.stageHeight - 40;
var leftdown:Boolean = false;
var rightdown:Boolean = false;
var timeVal:int; // animation time

addChild(clownShip);

stage.addEventListener(KeyboardEvent.KEY_DOWN, listenKey);
stage.addEventListener(KeyboardEvent.KEY_UP, listenKeyUp);

function listenKey(event:KeyboardEvent)
{
if (event.keyCode == 37) { //Left arrow
leftdown = true;
}
if (event.keyCode == 39) { //Right arrow
rightdown = true;
}
}


function listenKeyUp(event:KeyboardEvent)
{
if (event.keyCode == 37) { //Left arrow
leftdown = false;
}
if (event.keyCode == 39) { //Right arrow
rightdown = false;
}
}

addEventListener(Event.ENTER_FRAME, moveClownShip);

/*
function moveClownShip(event:Event) {
if (leftdown == true){
clownShip.x = clownShip.x - 10
}
if (rightdown == true){
clownShip.x = clownShip.x + 10
}
}
*/

function moveClownShip(event:Event) {

var speed:Number = 110.0;
var timeDiff:int = getTimer()-timeVal;
timeVal += timeDiff;

if (leftdown == true){
clownShip.x -= speed*timeDiff/1000;
}

if (rightdown == true){
clownShip.x += speed*timeDiff/1000;
}
}

One more thing the /* and */ serves as the opening and closing of comments in AS3.

Well, I hope you grab the difference between frame based and time based animation programming. This tutorial has been quite confusing to write for some. Next I am going to talk about how we are going to rearrange these stuffs into classes. Well, you can’t actually escape from classes, from school classes to C++ … classes are there to stay. We need them to keep things organize if we are going to do anything bigger than moving single object with our thoughts and balance ourselves with one hand around and also it’s the OOP (object oriented programming – I can see you all yawning now) way.

Thursday, October 30, 2008

AS3 05 - Interactivity with stage. My First spaceship

We have learned how to trace to the output tab, how to listen to keyboard strokes and how to create symbols and create instances in the stage in AS3. In this tutorial we will look into interactivity in the stage. It’s simply a combination of previous tutorials so just take a look see at them if you find this one rather err.. confusing.

Create a new Flash File. Draw a simple clown ship shape on stage. Mine look like this…

Not much of a clown ship but it will do. Convert it to symbol with ‘Export for ActionScript’ and put the name ‘myShip’ for the clown… I mean ship. Now once converted, it should appear in the library like this…

Now delete the original shape on stage. Yes… delete it! Select it and delete. Don’t worry… it has been immortalized in the form of a symbol in the library… well until you delete the symbol.. hmmm. Ok now the stage is empty. We will use AS3 to fill it with the clown ship.

Right click and select ‘Action’ on Frame1 to bring up the ActionScript Editor. (Actually this is not the best way to do this… I will explain in future like few years down the road. but it should be ok for now). Create an instance of the clown ship on stage.

var clownShip:myShip = new myShip; //yes… the name clownship is catching on!!!
addChild(clownShip);

‘//’ Simply puts the characters after ‘//’ as comment until the end of line. It’s good for forgetful programmers to comment so that they may refer to their codes easily and equally easy to be stolen and reuse…

You can test the movie now by pressing ‘CTRL+ENTER’. Your clownship appears to be on top left corner of the stage. Position it near bottom middle…

clownShip.x = stage.stageWidth/2;
clownShip.y = stage.stageHeight - 40;

Now this will cause a little overhead to the processing power. Why? Because we could have set the x (horizontal) and y (vertical) position of the clownShip before we add it into the stage (addChild). Currently we add it to stage (default at 0,0) then move it to half of the stage’s width and 40 pixel from the bottom of the stage.. meaning the flash player needs to first position it at 0,0 and then reposition it at stageWidth/2, stage.stageHeight-40…. 2 steps of rendering the clown shape on stage.

We could go around this by re-arranging the codes as below

var clownShip:myShip = new myShip;
clownShip.x = stage.stageWidth/2;
clownShip.y = stage.stageHeight - 40;

addChild(clownShip);

This way, the flash player only needs to render the clownShip once at stageWidth/2, stage.stageHeight-40.

Big deal, we got tons of processing power… that’s what we all thought. But it is these small things that eat up the processing power itty bitty by itty bitty and if you loop the above statement by 1000 times, those will be an additional 1000 steps the flash player needs to take. Now, since the force is strong with this clown…, once we got the clownShip where we wanted it to start with, we need to add an event listener. You do remember how to do that don’t you? In the AS editor, add in these lines of wisdom codes.

stage.addEventListener(KeyboardEvent.KEY_DOWN, listenKey);
The listener will call the function listenKey each time a key is pressed. Now lets put in the listenKey function…

function listenKey(event:KeyboardEvent)
{
if (event.keyCode == 32) {
trace('I have pressed the spacebar');
}
}

This function receives keyboard event and if you look carefully the keyboard keys are referred to by numbers. It’s ok, you just need to memorize all keys and their corresponding key code (keyCode). For example, the ‘spacebar’ holds the keyCode of 32, the ‘up arrow’ holds 38, down 40, left 37 and right 39. Now if you got a key which you would like to find out its key code, you can add this line to the code…

trace(event.keyCode);

…in the listenKey function. So basically the function would look like this…

function listenKey(event:KeyboardEvent)
{
trace(event.keyCode);
if
(event.keyCode == 32) {
trace('I have pressed the spacebar');
}
}
Try to test run the movie, remember to check the ‘Disable Keyboard Shortcut’ from the test movie window and press any key to see their corresponding key codes being displayed in the output (debug) window in the flash app. Hmm…. There is another thing called charCode instead of keyCode. Try reading about it in the help section. Now that was redundant…

By now you should be able to know whichever key codes for any keys you wish to know to really want to know, you know. Now lets move on to moving the clown left and right via the keyboard. First you detect the left and right arrow keys…

function listenKey(event:KeyboardEvent)
{
if (event.keyCode == 32) {
}
if (event.keyCode == 37) { //Left arrow
}
if (event.keyCode ==
39) { //Right arrow
}
}
…then you add or minus from the current clown’s horizontal position… here…

function listenKey(event:KeyboardEvent)
{
// trace(event.keyCode);
if (event.keyCode == 32) {
// trace('I have pressed the spacebar');
}
if (event.keyCode == 37) { //Left arrow
clownShip.x = clownShip.x
- 3
}
if (event.keyCode == 39) { //Right arrow
clownShip.x =
clownShip.x + 3
}
}

What happened here is I minus the x position of the clownShip by 3 pixels whenever I press the left key and add 3 pixels to it whenever I press the right key. What are pixels you say? They are actually related to pixies, fairies and all sorts of mythical beast as if I know lots about… tiny dots on screen. Your screen resolution goes by pixels, 800x600, 1024x780… stuffs like that.

Now try to test run the movie. Move the clown around. Does it work? Well if it does, it is not looking good. A bit on the sluggish side I would say, especially on the start. Well, what went wrong? The whole damn tutorial went wrong! What happened was the delayed input of the keyboard thanks to the operating system… (yes blame it on Microsoft) … actually it’s because of these features you don’t get mulllltiiipllleee letters appearing when we type something. Now let’s make that point valid. Open your ‘Notepad’ and hold down a key…. you notice that it repeats only after certain interval. That was what was happening. We will er… tackle this issue once I find out in the next tutorial. Meanwhile try to make the clown move up and down.

AS3 04 - More About Instances

From the previous post… what we have done is adding a rectangle manually in the stage and repositioning it via AS3. What if we want to add additional rectangle? Are we going to draw it out one by one? In a game, we are most likely to add enemies… waves and waves of enemies. We draw / import a sample enemy (in this case… a movieclip we created earlier called ‘myRect’) into the library and make copies (instances) of them on the fly on the stage whenever we need them. Get it? I just referred to the movieclip = sample enemy and instances = copies of enemies.
Now in order to make copies of the enemies we need to refer to the original sample enemy (in the library called ‘myRect’ – remember we tick on the ‘Export for ActionScript’ when we created the ‘myRect’ symbol? Take note on the class name on the Linkage section because that’s the class we are refering to. What do you mean no?). Here we create the new instance from ‘myRect’ with the name of ‘myRectIn2’

var myRectIn2:myRect = new myRect();

Now that we have the name of the second rectangle, we can reposition it like what we did with the first one.

myRectIn2.x = 200;
myRectIn2.y = 200;

Now the second rectangle is not gonna be displayed on the stage unless we add it into the stage thus….
addChild(myRectIn2);

or
stage.addChild(myRectIn2);

whichever you prefer… they both work… which brings to the point that what I wrote here isn’t necessarily the only method to achieve similar results.


This article has been brief because I am lazy not because I am lazy but I would like to streesss on the importance of not mixing or confused symbols reference in the library with instances references of the symbols because I always make this mistake when I started out and therefore they deserve an entire post for it.. (other than the one before this) err.. themselves...hmm. You will need to use these lots in future if you are interested to read more of my rumblings to pursue a higher karma understanding of stuffs yet to come. What the??