On this tutorial what we are gonna achieve is :
-
-
- Extend the clownship class (Adds more functionality to the Clownship class)
- Taking care of keyboard presses
- Introduction to movement
- Checking for boundaries so that our ship does not go beyond the viewable area
Meanwhile flash has moved to CS6 ... nah not yet as far as I know... still stuck with CS5. Anyway we are using Flash Develop so the only concern is the Flex SDK ... really... no really... really really...
Back to the codes... your directory should look as below.
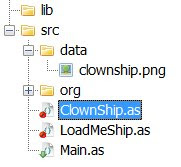
Note the 3 files...
1. ClownShip.as
2. LoadMeShip.as
3. Main.as
The Main.as sets up the entire flash player and calls LoadMeShip.as.
LoadMeShip.as then creates a new ClownShip instance called cship.
Below is the code for Main.as
package

{
import org.flixel.*;

 public class ClownShip extends FlxSprite
 {

  [Embed(source = "data/clownship.png")] private var ImgShip:Class;

  public function ClownShip()
  {
   loadGraphic(ImgShip);
  }

 }

}
Yet again the code for LoadMeShip.as
package
{
 import org.flixel.FlxState;

 public class LoadMeShip extends FlxState
 {
  private var cShip:ClownShip;

  public function LoadMeShip():void
  {

   cShip = new ClownShip(100, 100);
   add(cShip);
  }
 }
}
Wait a minute... it's not the same as the previous example... what's with the cShip = new ClownShip(100,100);
It was cShip = new ClownShip(); before.
Well my furry friend, let me introduce you to these things called parameters... what we are doing here is passing in 100 and 100 again as parameter
It's like when you get an
The entry point (constructor) to the ClownShip.as class is the function which has the similar name to the class name.
Previously
public function ClownShip()
  {
 loadGraphic(ImgShip);
  }
as the entry point (constructor... get used to the term constructor cause this is widely used by people that talks funny...)
To make it able to accept parameters we need to add it in the function declaration...
public function ClownShip(x:int)
  {
 loadGraphic(ImgShip);
  }
Note the x:int. This means accepting 1 parameter named x of type integer (32-bit signed integer). Yes you need to declare what kind of parameter this
So us having a higher plain of intelligence will quickly deduced that the constructor should look like this...
public function ClownShip(x:int,y:int)
  {
 loadGraphic(ImgShip);
  }
Get it? I do hope you do. Now loadGraphic has been explained
Ok now you can accept 2 parameters into the constructor, now what? The 2 parameters from cShip = new ClownShip(100, 100); is actually the X and Y coordinates where we want the ClownShip to appear, so within the ClownShip main function we call "super(x, y);". It should now look like this...
public function ClownShip(x:int,y:int)
  {
 super(x, y);
 loadGraphic(ImgShip);
  }
Wha? super? What the? Ok I think we need some words about the "super" function.
Here goes...
Now which class was ClownShip extended (derived) from? Any answers? Yes.. the FlxSprite class... (from the "public class ClownShip extends FlxSprite") so whenever we call "super
...
..
.
which in this case is the constructor function of FlxSprite, which is
"public function FlxSprite(X:Number = 0, Y:Number = 0, SimpleGraphic:Class = null)" from the FlxSprite.as file.
No don't look into the FlxSprite.as... just look into the documentation that comes with Flixel. From there you will also find out that the first and second parameter passed into the super corresponded with the X and Y coordinate of the created instance.
Okay so now "super" simply means referring to the parents (extended from) object. You can even call the parents object's function / method ... lets say you wanna call the "update" function from FlxSprite.. you can simply call "super.update();" which you are gonna use in the near future. :D
So I hope you pretty much get the idea of "super".
Now we are going to add a function which Flixel calls each game loop,
You are right.. it has already been inherited but then we wanna modified that update function to add in listeners for keyboard strokes so we want to override it's parents update function. How are we gonna do this? Well we use override...
override public function update():void {
}
What this means now is whenever Flixel calls the update for the ClownShip... it totally ignores the one it inherited from the FlxSprite and goes straight into the overrided one above. Overrided? Is this even a word?
We need to fix this. We need to add something to it... we need the FlxG.keys.xxx
override public function update():void
{
 if(FlxG.keys.LEFT)
 {
 x -= 3;
 }
}
FlxG.keys contains the keyboard stuffs you are looking for. To test for the left arrow key presses the "FlxG.keys.LEFT" is used
So here we are telling if the LEFT key is pressed we need to minus the x coordinate of the ClosnShip by 3 pixel making it move to the left by 3 pixels.
x -= 3; is the same as x = x - 3;
Now which is what key as what who where?
Simple... in Flash Develop, when you key in FlxG.keys. ->upon hitting the "." after "keys", a whole list of keys will appear for you to choose so you don't need to remember what key as what who where.
Now cater for RIGHT, DOWN and UP...
override public function update():void {
 if(FlxG.keys.LEFT)
 {
  x -= 3;
 }
 else if(FlxG.keys.RIGHT)
 {
  x += 3;
 }
 else if(FlxG.keys.DOWN)
 {
  y += 3;
 }
 else if(FlxG.keys.UP)
 {
  y -= 3;
 }
}
Now run the game... tadaaa... you have keyboard control of the ship :D Yeah it goes beyond the viewable boundaries so we add...
if(x > FlxG.width-width-4)
 x = FlxG.width-width-4; //Checking and setting the right side boundary
if(x < 4)
 x = 4;

if(y > FlxG.height-height-4)
 y = FlxG.height-height-4; //Checking and setting the right side boundary
if(y < 4)
 y = 4;
This should stop it from going beyond the boundaries with a 4
The final ClownShip.as should look like this..
package
{
import org.flixel.*;

 public class ClownShip extends FlxSprite
 {
  [Embed(source = "data/clownship.png")] private var ImgShip:Class;


  public function ClownShip(x:int)
  {
   super(x, y);
   loadGraphic(ImgShip);
  }
  override public function update():void {

   if(FlxG.keys.LEFT)
   {
    x -= 3;
   }
   else if(FlxG.keys.RIGHT)
   {
    x += 3;
   }
   else if(FlxG.keys.DOWN)
   {
    y += 3;
   }
   else if(FlxG.keys.UP)
   {
    y -= 3;
   }

   if(x > FlxG.width-width-4)
    x = FlxG.width-width-4; //Checking and setting the right side boundary
   if(x < 4)
    x = 4;
   if(y > FlxG.height-height-4)
    y = FlxG.height-height-4; //Checking and setting the right side boundary
   if(y < 4)
    y = 4;
  }
}
You should now have some idea about "super" and the all important "update" function which is called each game loop.
Also important is the concept of parent and child function overriding :D
The end product should look like this ...

That's about it this time :D This is turning out to be an introdution and understanding of classes and stuffs rather than game programming... hmm... well next time we are going to look into Flixel specific variables like Speed, Acceleration, Drag and how to handle multi key presses
4 comments:
Cheers, very useful...
Very nice, thanks!
Glad you like it :D Thanks.
Everything is explained. Great tutorial, thanks
Post a Comment