I
We are now at tutorial 7. We started with placing movieclips, symbols and instances in Flash, getting the input from keyboard, moving objects around based on frame and time. All these were done within the frame in the timeline.

Not that it is a bad thing to start with but as you progress
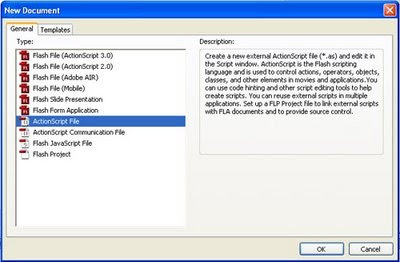
Create a new Flash File (ActionScript 3.0). Copy over the myShip symbol (the movieclip type you see in your library section.

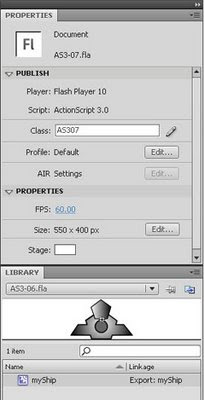
Name it AS307.as. It a big white empty space for you to write scripts in. Now go back in the main Flash File, in the document properties section create a link to the ‘AS307.as’ by typing in the Class as ‘AS307’ which is the filename of the ActionScript file we just created. It should look like this…Class : AS307 with the myShip in the Library.

Run the test movie. It’s a blank file so nothing is there. Go back to the ActionScript AS307.as file. It’s blank. Yeah.. I repeated twice.. Let’s write out our first class.
package {
 import flash.display.*;
 public class AS307 extends MovieClip{
 }
}
If you run the test movie, it’s still a blank screen. What we did here was a bare minimum for a class declaration. Each class starts with package{} for the class. Within the package we need to import predefined items which we are going to use…. Example if we are to use the textbox functions within the class, we need to write in
import flash.text.*;
For the time being, importing the flash.display.* should be sufficient. Within the package we declare the class name. The class name we declare here must be similar to the filename of the .as file. We named our file AS307.as so the class name is AS307 not very interesting isn’t it? Now we need a constructor… what’s a constructor? It’s a function that runs whenever the class initializes, that means whenever it starts. The constructor must have the same name as the class
Filename : AS307.as
package {
 import flash.display.*; //Importing all display related…

 public class AS307 extends MovieClip{

  public function AS307(){ //Constructor
    trace('Hello world again');
   }

 }
}
I put in a trace statement so when you run the test movie, you should see ‘Hello world again’ in the output window. Let’s extend this and put in the clownShip at the same time takes out the trace statement.
Filename : AS307.as
package {
 import flash.display.*;

 public class AS307 extends MovieClip{

  public function AS307(){
var clownShip:myShip = new myShip;
addChild(clownShip);
   }

 }
}
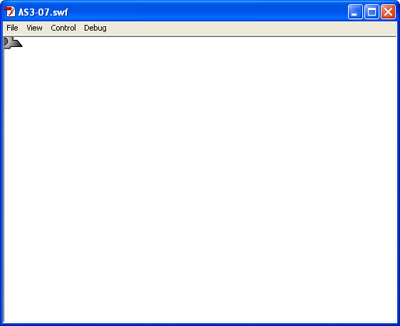
Run the test. Your clownShip should appear at coordinates (0,0) like below.

Well what happened was we created a variable (var) named clownShip of type myShip with …
var clownShip:myShip = new myShip
…then we add it into the scene / stage with the addChild().
Now we are NOT going to tell the clownship to move to the near bottom middle like what we used to at AS307.as. Why? Because it’s not the OOP (Object Oriented Programming) way.
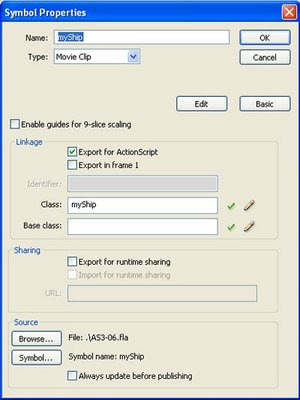
Create another ActionScript file and named it myShip.as (save it as myShip.as). This will automatically be referenced to by the myShip object in the library. How? Go back to the main flash document AS3-07.fla. Notice the myShip we copied from the previous projects in the library section? Right click it and choose to view its properties. Under ‘Linkage’ look at ‘Class’, it shows ‘myShip’. This is also the class filename for that particular symbol.

Now in the myShip.as file, code in the class and all those
package{
 import flash.display.*;
 public class myShip extends MovieClip{
 }
}
Again we need to import the flash.display.* because we are extending the functionality of myShip from the MovieClip class which is actually part of the flash.display.* class. Am I saying it right? Please correct me if I am wrong
package{
 import flash.display.*;
 public class myShip extends MovieClip{
  public function myShip(x,y){
   this.x = x;
   this.y = y;
 }
}
Note I have 2 parameters that needed to be passed into the constructor function. This means whenever I create / initializes the myShip, I need to pass in 2 items, the x and y coordinates. So lets go back to AS307.as and alter the script a little. Put in
var clownShip:myShip = new myShip(stage.stageWidth/2,stage.stageHeight - 40);
replacing the
var clownShip:myShip = new myShip;
The codes should look like this...
Filename : AS307.as
package {
 import flash.display.*;

 public class AS307 extends MovieClip{

  public function AS307(){
     var clownShip:myShip = new myShip(stage.stageWidth/2,stage.stageHeight - 40);
     addChild(clownShip);
   }
 }
}
We are actually passing the start x and y coordinates for the myShip. Now run the test movie. The clownShip should appear at middle bottom. My my… this is turning out to be a long winded tutorial.
Next we will need to create an event listener for keyboard and how it communicates with the clownShip. The event listener should be placed at the AS307.as file while the actually code to move the ship should be placed in the myShip.as file. Why?
var leftdown,rightdown:Boolean = false;
…in the main public class. Wait.. I think I skipped a part. What is with the public.. public stuffs? Simple… there are only 2 popular ones… public and private. It’s like err… taxi and a normal car. In the taxi (Public transport) you can hop in and start asking and directing the taxi anywhere while in the private car, you can’t do that unless you are somehow related to the driver. Same goes here in AS3, public functions / methods / variables… are accessible by all… meaning declaring the leftdown and rightdown as public will enable other classes to access to it. If this sounds confusing, it’s time for your another best friend… google. hehe… for more information. Anyway lets get back…
You need to put the event listerners to run whenever the class initializes / started so it should be in the constructor
stage.addEventListener(KeyboardEvent.KEY_DOWN, listenKeyDown);
stage.addEventListener(KeyboardEvent.KEY_UP, listenKeyUp);
Also note that those pesky listeners calls ‘listenKeyDown’ and ‘listenKeyUp’ functions. Lets code those functions…
 public function listenKeyDown(event:KeyboardEvent)
 {
  if (event.keyCode == 37) { //Left arrow
   leftdown = true;
  }
  if (event.keyCode == 39) { //Right arrow
   rightdown = true;
  }
 }


 public function listenKeyUp(event:KeyboardEvent)
 {
  if (event.keyCode == 37) { //Left arrow
   leftdown = false;
  }
  if (event.keyCode == 39) { //Right arrow
   rightdown = false;
  }
 }
It you notice carefully, these are the same codes we coded from the previous tutorials, we are only rearranging them in classes. Try to run the test movie. You will get an error! Why? Because unlike the codes we put in the timeline, we need to import the flash.events.*, so that the event listerner, keyboard events and other events related stuffs can work.
The AS307.as file should look like this…
Filename : AS307.as
package {
 import flash.display.*;
 import flash.events.*;

 public class AS307 extends MovieClip{

 var leftdown,rightdown:Boolean = false;

  public function AS307(){

     stage.addEventListener(KeyboardEvent.KEY_DOWN, listenKeyDown);
     stage.addEventListener(KeyboardEvent.KEY_UP, listenKeyUp);

     var clownShip:myShip = new myShip(stage.stageWidth/2,stage.stageHeight - 40);
     addChild(clownShip);
   }


  public function listenKeyDown(event:KeyboardEvent)
  {
   if (event.keyCode == 37) { //Left arrow
    leftdown = true;
   }
   if (event.keyCode == 39) { //Right arrow
    rightdown = true;
   }
  }


  public function listenKeyUp(event:KeyboardEvent)
  {
   if (event.keyCode == 37) { //Left arrow
    leftdown = false;
   }
   if (event.keyCode == 39) { //Right arrow
    rightdown = false;
   }
  }


 }
}
Now that we are done for AS307.as, we move on to myShip.as. As we are going to add event listerners and use timer objects for the movement, we need to import…
 import flash.events.*;
 import flash.utils.getTimer;
.. add an event listerner (oh man this tutorial is getting lengthy…) and the function called by the event listener.
The whole file should look like this…
Filename : myShip.as
package{
 import flash.display.*;
 import flash.events.*;
 import flash.utils.getTimer;

 public class myShip extends MovieClip{
  private var timeVal:int;

  public function myShip(x,y){
   this.x = x;
   this.y = y;

   addEventListener(Event.ENTER_FRAME,moveClownShip);
  }
  public function moveClownShip(event:Event) {
   var speed:Number = 110.0;
   var timeDiff:int = getTimer()-timeVal;
   timeVal += timeDiff;

   if (MovieClip(parent).leftdown == true){
    this.x -= speed*timeDiff/1000;
   }

   if (MovieClip(parent).rightdown == true){
    this.x += speed*timeDiff/1000;
   }
  }
 }
}
Run the finish product. You should get exactly what you got when you program it in the timeline in the previous tutorial. The only difference here is the codes are now in classes instead of timeline. It requires a bit more work but the result is
No comments:
Post a Comment